Free shipping on orders of $50 or more within the USA and $90 or more to Canada! Note: Shipping to Canada is experiencing significant delays. See shipping policy page.
Get the latest Academy content and special deals direct to your inbox
Have you ever wondered how to create Scarlett Johansson’s short undercut hairstyles she rocked around 2014 to 2017? In this article and video Russell Mayes, Director of Content for JATAI, guides you in a step-by-step Scarlett Johansson short hair tutorial on how to achieve this iconic style. This look is timeless and needs no update.
You can get the full YouTube experience by watching this video below (which is also featured in our Education Connect portion of Jatai Academy. You can follow along with the transcript below.
Welcome to the Jatai Academy. Today we’re going to be doing an undercut, the undercut that Scarlet Johansson wore for a while and I think it’s very cool. So let’s get started.
So if I’m looking at you know some short hair that Scarlett Johansson wore. When it was really short it was basically an undercut with the top grown out longer. Then at a certain point she decided to let the undercut grow out and we started getting a little bit longer in the sides. And I think that it was very very stylish and she did a great job of the grow out period because sometimes when it’s cut really short underneath it’s hard to grow that out.
But you know hairstyles like this that show the in between where she was growing it out, I think are really really modern today. So let’s take a look at how to do that. So we’ve gone through and sectioned out the top of the head from the bottom of the head.
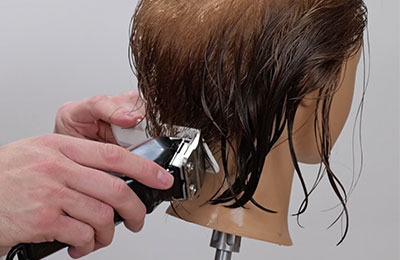 Now we’re going to go through with the clipper and we’re going to cut everything underneath pretty short. So I’m not going to go through and be really perfectionistic about my clippering right now. I just just want to go through and remove most of the length so that I can go through and change the texture a little bit later on.
Now this first section right up the middle I’m basically just guessing at the length that I want and I’ll go through and just go through the motions of cutting it. Then I’m going to look at it and see is that type of length that I want. I think I want to leave this a little longer than it being cut really really short. And I think that that’s looking pretty good.
So now from here I have a guide. As I start to work around the head I can use the guide in the center for the guide that I’m cutting for the hair that I’m cutting as I move left to right.
So this is a very very classic tapering technique where I’ll start shorter at the bottom and get longer as I go up the head. So it’s shorter here at the bottom hairline and it gradually gets longer.
So in the back I’ve worked horizontally. Then, I come to the side and I work horizontally. And then I’ll go through and work an angle which is going to be parallel to this hairline right behind the ear. I’ll work the angle to blend the two together. Now that way I’ve got a rough shape into it and then I can start to fine-tune my shape from here.
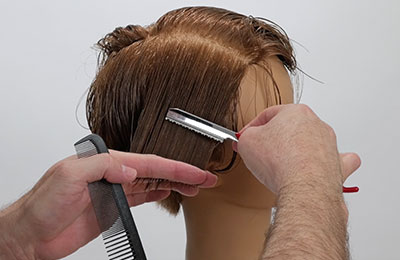
 And now I’m going to use my Jatai Tokyo Thinning Scissors and I’m going to go through and trace what I’ve got cut underneath initially just to soften everything up.
Now this is going to go through and do two things: it’s going to remove weight and make it softer and it’s also going to make it a little bit shorter so I can get a little bit cleaner. And it just takes a little bit of time and a little bit of practice and some patience to go through and do this but the end result is going to be worth it.
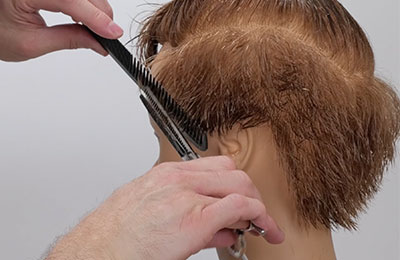
So I’ll start and I’m going to go through and scissor over comb and trace everything that I’ve already cut and just cut the last quarter inch of the hair to make sure everything is softer.
Now when I first start going through I’m not going to see a whole lot of result and that’s okay. I will be able to fine-tune it once everything’s dry and I’ve got everything in its natural fall. Now right here I don’t like the way that’s fitting in so I’m going to go through and hit that a few more times and see how it reacts and that’s reacting a little bit better.
Now we’ve gone through and we’ve dried the underneath so that I can see exactly how the hair is going to react, how short it’s getting and how much texture I’m putting in through it. Now I’m going to go through. I like this length that we got here.
I’m going to taper that in a little bit tighter around the edges in the nape and I’m also going to take this a little bit shorter over the ears. I think that that would look better if that’s a little bit softer and shorter.
So now I’m going to go through and do the same sort of scissor over comb that I was doing with my Tokyo Thinning Scissors but on dry hair and I’m going to really start to fine-tune and fit this in. So what I’m going to do is basically scissor over comb everything and taper this in a little bit tighter just here in the at the bottom of the nape.
Now these mannequin heads can get a little pokey around the edges where the hair gets short and that’s okay. I’m just going to fine-tune that in just like I would a shrubbery or something of the sort or I’m just going to visually cut it in to make it fit and take some of the length off and still keep it soft.
One of the pictures that we saw she was really blended here in the back and then it got longer and disconnected towards the front. So that’s what we’re going to do. So in order to do that I need to separate the front of the head from the back of the head. So I’ll find where the crown is, take that section to the top of the ears. So now we’ve got from the crown going back. And the way I’m going to do that is I’m going to pivot right in the center.
 Hold this out at curvature of the head which is going to be like that. So I’ll just lay the comb where it sticks out. I want the top of this section to be held at that angle as I’m pulling the rest of it out vertically. So it’s going to look like this right here. Now I’m going to continue that angle of my graduation that I started from tapering the underneath on up to the top. And I’m going to use my Feather Styling Razor in pink.
So we’re going to start right here in the middle, hold this out at the proper elevation which is going to be right there. Start where my short hair is, gradually build that out to my longer length. Don’t miss anything. Comb. Look at that. See how that’s going to blend. I think that’s going to be fine. So we’re going to continue on.
Now I will pivot my next section which is going to pivot to the corner of the hairline. I’ll pull this out, same elevation right here at the top center. There’s my length falling out. Pull that up and out and through.
Next section, pivot to the mastoid, that bump right there behind the ear. I’m going to pull this back. There’s my line underneath. Go through. Razor that through. Anything that hangs out that I missed, cut that off. Got that. The last section, I’ll pull off the peak curvature of the head. There’s my guide underneath. Go through. Razor that off.
Now this is going to completely blend with the back so that when this fluffs up it’s going to blend beautifully through here and it also gives me a length that I can start building my length going towards the front. So now from here I’m going to take the right half. I’m going take a horizontal section and I’m going to use this length that I created in the back here and blend that through towards the front.
So I’m going to hold this out off the peak curvature. There’s my line and then I’m going to guess how long I want it in the front and I’m going to start building up more length as I get to the front holding this out at peak curvature of the head. The way that I can always check that is just hold the comb right there at the parting.
Wherever that elevates to, that’s where I want to hold that. Now I’m going to continue taking the same horizontal sections until I get to the center of the head. Again, going off the curvature of the head starting at the tip of my blade. And as I work through the section I will go towards the heel of the blade. So that way I can evenly dull the entire blade at the same time. And I think that that’s looking pretty good. There we go. Now we’re going to do the same thing on the other side.
 We’ve got our basic shape in and now I’m going to go through and put a little bit of internal texture into it using my Jatai Feather Styling Razor that has the Texture Blade into it.
Now the Texture Blade has little gaps in it that prevent hair from touching the blade so it’s only cutting like every other hair and I’m going to go through and hold the section horizontally, lay the blade against the head and just gently fillet through and you can see how that’s creating separation through there and taking some weight out of the ends.
Now I don’t want to go through and be very aggro and you know like He-Man it. I want to go through and gently just apply a little bit of texture to take some of that weight out and give me a little bit more separation. I’m going to go through and methodically work every section without picking up previous sections that I’ve already texturized. That way I don’t over thin one particular area.
An area that may have a little bit more weight, I may go back through and do, but my first pass through I want to be very very judicious in my application of texture. Nice, easy. Removed the weight. Gave me some separation. I think that’s looking pretty good.
Now this section right here in the front I’m going to go through and take a little bit of that point off because when I pulled it both over to the sides that’s going to leave me longer in the middle. So I’m going to go through, comb this through and down and take a little bit of that point off and I’m going to do it with my Texturizing Blade so that I can keep everything really really soft and textured.
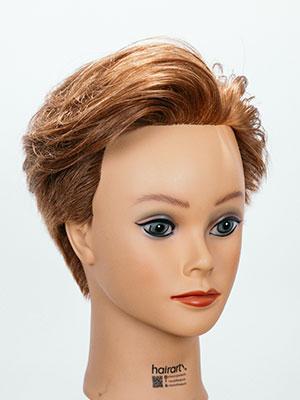
Here’s our end result. We’ve got you know a little longer in the front. We’ve got it undercut underneath on the sides and the back. We kept it really soft and a little bit longer so it’s not that hard edge and it blends through here in the crown which I think looks pretty good.
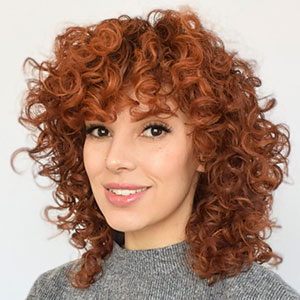
And she wore her hair a lot of different ways. Sometimes it was down and kind of swept over a little fuller in the back like we did here. Sometimes it was very much up you know and gelled up and off of her face you know kind of to the side, so for the award show or the fashion show she was going to. The Scarlett Johansson curls were elegant and striking. She wore it a bunch of different ways and this haircut is very very versatile for that. Scarlett Johansson with short hair was an iconic hairstyle for her and is still remembered to this day. Scarlett Johansson hair 2015 is still a beautiful style that’s modern for today’s looks.
So add it to your repertoire. Let us know what you’d like to see in the future. Check out the Jatai Academy. There’s all kinds of great information on there that will make you a better hair stylist and barber and we will see you next time. Thank you for watching.
If you liked this Scarlett Johansson hair tutorial, you may like our other tutorials in our Education Connect section of Jatai Academy.
JATAI provides innovative and professional quality beauty implements with world-class customer service and educational support. To offer great products as a master distributor, we seek out and select only manufacturers who demonstrate superior workmanship, the most advanced technology, and respected business core values of reliability, honesty and integrity. Accordingly, JATAI represents three major ‘workhorse’ brands that dominate within their categories. Feather, Seki Edge and Fuji Paper. JATAI Academy brings beauty tools to creative life. It’s the ultimate professional information resource where Education, Artistry and Trends CONNECT for Stylists and Barbers.