Free shipping on orders of $50 or more within the USA and $90 or more to Canada! Note: Shipping to Canada is experiencing significant delays. See shipping policy page.
Get the latest Academy content and special deals direct to your inbox
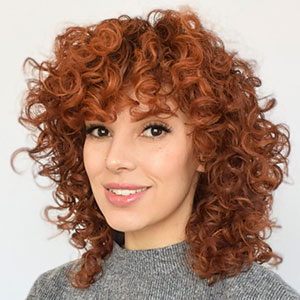
There are so many different hair trends with various names. Two popular hairstyles are the wolf cut and octopus cut. An octopus haircut vs. wolf cut have several differences. A wolf cut is layered more around the face while an octopus has layers all around. Octopus styles have a puff of volume in the crown and less weight in the lengths whereas the wolf cut has a more solid perimeter shape. Both are easy to style and wear whether it be keeping it straight or putting in loose curls or waves. It can be done on curly hair, medium to longer hair and the styling requires little product. They also look good with any hair color. These are 2 beauty trend styles that are classic and timeless.
In this article we will discuss how to do an octopus haircut. You can watch the video below and follow along with the transcript. If you’d like to how to do a wolf haircut, see the very bottom of the article for a link to a wolf cut tutorial.
Welcome to the Jatai Academy. Today we’re going to be covering how to do an octopus layered haircut which is basically a layered haircut with a little bubble on top but we’re going to do it a little different than last time. This time it’s going to be much more textured. It’s going to have a lot more separation to it and a little bit more fullness. So let’s get started.
 Before I go through and section off everything for my layering I want to go through and make sure that I have the perimeter length at the length that I want. So I’m going to start by taking a center section straight down the back of the head and while I’m not worried that this line is perfectly crisp and solid and straight, I do want a crisp point cut to it. I want a real deep crisp point cut to force it to separate into pieces stronger.
So I’m going to use my Kyoto Scissors from Jatai. These are the sharpest scissors that I have. It’s got a nice blade so when I go through and do a deep point cut on it because it’s sharp I’m going to get a really nice crisp line to it. Take everything down. Any part that hangs off that looks kind of gnarly we’re going to take off and I want a real crisp point cut into this length.
I’m going to show you how I’ve sectioned out the head. I’ve taken a natural or center part straight back to the quarter part, quarter part straight down to the center of the spine. From the top of the head I go to the top of the ear. That’s going to be my quarter part. So I have front and back. Now in the back I’m going to separate from the drop crown which is the section between the top of the head and the occipital bone. It’s right there in the middle. It’s also the top of the parietal ridge on the side. So it’s going to go straight across. This is going to be my shortest part and then everything else is going to blend in from that.
 I’m going to go through take a center section. I’m going to pull this section straight up and I want to kind of cut this horizontally across the top. So I’m going to pull this straight up and across, figure out where my shortest length is going to be, point cut that straight across the top.
So now I’m going to take my next section. It’s going to be parallel to this center section. I’m going to pull this guide right into my second section. So I have the first section and the second section. I’m going to comb those two together and in the center of that section, using my center as the guide, I’m going to cut that straight across.
From here I’m going to remove the center section. Now I have section number two. We’re going to go through take section number three which is parallel to section number two. I’m going to comb those two into the center of both of those two sections, hold straight up towards the ceiling, follow my center guide or my previously cut guide, cut that straight across the top.
After I’ve removed section number two at section number three I’m just going to comb everything else straight up into section number three, go through cut that across. I have the center section on the first side. Now I’m going to go through and take a parallel section to that on the second side and repeat the same steps I did on the first side where I’m combing everything into the previously cut section and cutting that straight across.
Give us a thumbs up, click subscribe and the notification bell to be notified of future Jatai Academy content.
 Okay so we got our top done. Now let’s move into the bottom. We’re going to take a center section all the way down. So now what I want to do is the first section I held that straight up. Now from here I’m going to hold this straight up, but I’m also going to angle my fingers so I can go from this short piece to this long piece down here in the bottom. I’ve already cut this so I’m going to get that out of the way. Small piece. I’m going to pull that straight up, angle my fingers, continue my point cut as I go from short to long.
Take a small piece as my guide. We’re going to take the rest of this section. Again, pull straight up, angle my fingers all the way down to my length. Now from here I’m going to pivot as I go around. Before I was doing parallel. Now I’m going to pivot. Remove the top. I’ve already cut. Then take a small section here, comb everything clean from the root all the way straight up. There’s my guide. I’m working my angle, cutting that down and through. Take the rest of the section. If I need to I’ll break it down into smaller sections. Comb that up. I see my guide from underneath. Cut that down and through.
Good. Now we’re going to remove my center section and add my next pivot, just following the same pattern that I was doing before, combing everything straight up to the ceiling. There’s my guide from underneath, follow that through, get the previously cut hair out of the way up and out. Come on there we go.
Next section up and out. Now we’re going to take our last section, remove the top. I’ve already cut that. Before I was walking the guide around but once I reach the corner of the hairline I’m going to pull everything in back to that corner the hairline into this previously cut section. Up and out. There’s my guide. Cut that through. Remove the previously cut section pulling this down and through up. There’s my length on the bottom. I’m going to go through.
Cut that down and through. Alright let’s check ourselves out here and see how we’re looking. We’ve got a nice short amount of layering on the top. Because this was layered at a lower elevation because it was layered at 90 it’s going to have more weight than the hair underneath of it which was actually held at a higher elevation going all the way up. It was probably held at about a 180. So because the top is going to have more weight it’s actually going to have more volume because it’s going to be more solid. The underneath because it’s been over layered it’s going to have a tendrilly effect. So you’re going to have this weight build up here in the crown and then a tendrilly effect underneath. So now let’s go through and do the same thing on the other side.
 Now that I finished my layering in the back I’m going to move into the sides and I want to make sure that I keep everything an even wetness. And I want to make sure that I can keep the cuticle as compact as possible. So I’m using Jatai Blade Glide. This will help keep everything crisp and compact and also an even moisture content throughout.
I’m going to take a section from behind my quarter part. That’s going to be the guide for the layering as I work around the front. I’m now going to go through and take a parallel section to my quarter part, my quarter part straight up and down. So I want to make sure that this section is straight up and down.
So now I have my parallel section plus a guide from the back half of the head. I’m going to go through pull this up and now from here I have to go to this length on the side so we’re going to extremely angle that layering around the front half of the head. We’re going to blend it through at the very top. Make sure that this length right here blends with the length behind it and then from there I’m creating a completely new guide.
Comb everything straight up going from short to long as I’m working that through all the way down to my perimeter length pulling everything straight up. There’s my perimeter length cutting that down and through. It’s more important when I’m doing extreme angles of layering like this. It’s far more important that it blends top to bottom meaning from here to here then it does front to back. So we’re not worrying if it blends front to back. We’re only worrying if it blends top to bottom.
My next section should be very little hair especially because of our receding hairline. I’m going to pull this straight back into the previously cut section. There is my guide going short to long pulling straight up towards the ceiling and making sure that blends top to bottom.
Pulling this straight back to my quarter part, pulling everything back to the quarter part. There’s my guide from underneath cutting that through. That’s going to do very nicely. So now let’s go through and do the same thing on the other side. Okay so we’ve got our layering done. So now let’s go through and just make sure that all of our layering around the front has a nice smooth blend to it.
 So I’m going to go through take a center section lay the comb flat against the head where it leaves the head straight down to the top of the ear. Going to do this on both sides. From here I’m going to take a little pie section right in the middle. We’re going to comb It forward off peak curvature of the head and then we’re going to go through deep point cut that so I have a nice crisp point cut because I’m using my sharp Kyoto Scissors. Comb that out of the way. Going to pull this forward as well and just make sure that we have some nice crispy point cuts around this front to help with separation and I’m only going to do it to this section right here.
Same thing on the other side. Oh we can already see how that’s starting to flick better on its own. Now let’s blow it dry see how we look and see where we need to add some texture to it. So what I’m going to do is I’m going to comb out and right in the midsection I’m going to take my Tokyo Thinning Scissors and go and hit just right in the middle.
Pull that out so that way I can thin some hair and create a little bit more movement just in the middle. And I’m only going to do that in the thickest areas where I feel like it’s not really flowing that well. So I’ll comb this out. I’ll say a little there a little there. We’re going to pull that out. Go up. You can see it right through there. Boom boom boom and I think that that’s going to flow a lot better once we get some of that internal thickness out of it. Comb out. We can see not much there, a little bit right there. Comb up. That’s looking pretty good.
Give us a follow on your favorite social media platform @jataifeather
There we’re going to pull some of that, take that, pull that out. This is purely subjective and visual where you feel like the hair needs a little extra removal and I’m just going to continue doing this throughout the rest of the head. Here’s our end result and I think that uh we’re looking pretty good. We got a nice little bit of movement around the front.
We’ve got a nice solid crown with some good volume because this is nice and short but it’s still a solid shape through here in the crown which ends up going really soft and tendrilly and really layered underneath and I think that’s what really gives this shape you know the the octopus you know vibe is where it’s solid and full here and tendrilly and long and soft underneath. So I think it looks pretty good. I think it looks nice and you look fabulous my dear.
Also check out the Jatai Academy. There’s all kinds of fantastic content on there that will make you a better hair stylist and barber. Let us know what you’d like to see in the future and we will see you next time. Thank you so much for watching.

To see how to do a wolf cut, watch this video Soft Wolf Razor Haircut.
JATAI provides innovative and professional quality beauty implements with world-class customer service and educational support. To offer great products as a master distributor, we seek out and select only manufacturers who demonstrate superior workmanship, the most advanced technology, and respected business core values of reliability, honesty and integrity. Accordingly, JATAI represents three major ‘workhorse’ brands that dominate within their categories. Feather, Seki Edge and Fuji Paper. JATAI Academy brings beauty tools to creative life. It’s the ultimate professional information resource where Education, Artistry and Trends CONNECT for Stylists and Barbers.