Men's Short Textured Quiff Tutorial
by JATAI,
31 May 2024
Watch this textured quiff tutorial and gain the knowledge to create this style! The quiff short hair style is a popular men's haircut that is versatile, classic yet trendy at the same time. A texturized mens quiff is what gives this hairstyle it's unique ability to be styled in multiple ways.
If you know how to style a quiff you can make it look more casual and rugged or make it more sleek and formal. If you know how to do a good quiff with lots of texture, it will give a man a lot of options for wearing his hair.
Follow along with the video and transcript below.
Textured Quiff Tutorial:
Hello champion! I'm Russell Mayes. Welcome to Jatai Academy. Today we're going to be doing a textured quiff haircut, very fundamental, very basic. Short back and sides, lot of texture on the top.
And uh I think it works on a lot of different types of hair, a lot of different types of texture, a lot of different face shapes. It's a good one to have in your arsenal. So let's get started. on how to make quiff hairstyle.
We've got our haircut sectioned off. We're going to separate the top from the bottom and we're going to go right to the center of the recession to the quarter part, quarter part down to the drop crown. Same thing on both sides.
The Sides and Back
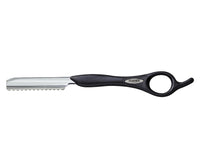
This separates the top of the head from the bottom of the head. So I'm going to go through and cut the sides and the back using my Feather Styling Razor. I have the special chrome edition which I think makes me look very fancy.
And since I'm going to go through and use this I'm going to start with a little bit of Jatai Blade Glide just to make the razor slide through the hair easier. My first section is going to be parallel to the front hairline at an angle.
I'm going to go through and comb that clean, angle my fingers out a little bit longer, keep my knuckles planted next to the head. And then I'm going to take a nice tight razor stroke. As I go all the way down and through.
Now here because it's sticking out I'm not going to freak out instantly. I'm going to go through and build the basic shape and then I can fine tune that and clean that up but I'm not looking for perfection.

The first section or the second section I want to build that perfection as I go. I'm going to comb this into the previously cut section following my previously cut guide, take that all the way down and through.
Take my third section comb it into the second section. There's my guide. The same razor stroke, go through and cut that down. Now here when I get to the ear I'm taking that section all the way down. And you can see from here that this angle is parallel to this hairline right behind the ear and it makes it easier for me to transition from the side into the back.
Comb this into my previously cut section. There's my guide. Comb that down and through. Here I'm going to maintain the same length that I got there and as I get to the bottom I'm going to make that a little bit longer because I want kind of a ratchet little shape. I want him to have a little bit of something going on here in the bottom.
So I'm going to take that. Now I'm going to go through and texturize that as we go but that's going to give me enough length that I can play with later on. Now I'm just going to continue this same methodology of taking parallel sections until I get to the center of the back.
My last section, repeating the same thing. Comb to the previously cut section. Use that as my guide. Follow that length until I get to the very bottom and then bring that out for a little more length and his little mud flap down through here.
This looks a lot better once I'm finished going through and doing the whole thing than it looked with my initial cut. My initial cut made me think 'oh my god I chose the wrong tool. Oh my gosh! What have I done? This is going to look terrible.'
But I have to trust myself that I can clean that up as I go and now once I finish this whole side it looks pretty smooth and it doesn't look like it needs as much cleaning up as I initially would think it would because of that first section. So you have to trust yourself and you have to trust the methodology as you start to go through and build your shape.
Now I'm going to do the same thing on the other side. Okay so now we've got our underneath section done. We got it the same on both sides but what I want to go through and do now is to taper this in a little bit tighter underneath and to texturize my mud flap here in the back.
Blending and Removing Weight

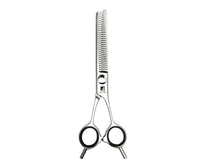
So I'm going to go through and use my Jatai Tokyo Thinning Scissor. This is the perfect thinning scissor for taking a medium amount of hair out. It's not going to be real ultra fine. It's not going to be real chunky and thick.
It's perfect for blending and perfect for removing weight. So I'm going to go through scissor over comb and I'm going to start underneath here. The reason that I'm using my thinning scissors as opposed to a clipper or regular scissor is so that I can maintain that razor texture that we've gone through and put through.
Follow us on your favorite social media platform @jataifeather
And I think that that's looking pretty good. Now here in the back I want to get some separation through here so I'm going to go through and deep point cut this with my thinning scissor.
That way it gives me that razor kind of texture and that separation but it removes some of the weight so it doesn't feel so dense back here because I just want these to be you know little flicks of a mud flap not a full-blown you know straight hardcore across the back flap.
Back and Top of the Head
Now we're going to go through and section out the back top of the head. So I took our quarter part which goes from the top of the ear to the crown to the top of the ear on the other side.
Now I'm going to go through and fit all of this in the back so that it all blends back here but it doesn't get too short in the crown and make my head look flat. There's my length from underneath and slowly start to build length as I go to the top. Pivot from the center.

Now I have two guides. I have the guide from this length underneath and I have the previously cut guide. Pull those into the center of both of those sections.
Continue to hold this out 90 ° from the head as I slowly increase my length towards the crown. Next section I'll pivot again.
Take the center section out. Now I have my section two and section three. There's my length.
Pull that up and out and gradually increase my length as I go to the top of the head. We'll take this whole section here. Hold that straight out. There's my length.
Come on there we go. Perfect. Now moving on to the top, I'm going to go through and take a horizontal section parallel to the previous section that I did to separate the top from the bottom using my guide underneath and cut this all the way through.
I am going to leave this a little bit longer here in the front. So because I'm leaving it longer in the front I'm going to start my cutting in the back. So I'll pull that up. There's my length and start to work from the back going forward leaving a little bit of length and a little bit of disconnection right there in the very front.
And now I'm just going to continue parallel sections, not too thick, not too thin as I continue all the way up to the top of the head and my last section. When I get to the center of the head. Hold this out. Follow my guide from underneath.

Now we've got that blended on the sides and in the back and we're going to do the same thing on the other side. We've got both sides finished now. So I'm going to go through and take a center section about the size of the nose right from the front all the way through to the back.
Now from here remember I cut this part back here pretty short so I'm going to use this and gradually increase my length as I go forward. Gradually increasing my length as I go from the back to the front.
Now this is totally your creative choice of however short you want the top to be, how much increase of length that you want, how much you don't. I'll take a parallel section going to my client's left side.
Both of those in the middle of both of those sections. Not to the center but the center of both of those two sections.
Now as I don't have enough hair to hold I'll go through and use my thumb to push the hair against the blade but making sure that I'm not pushing into the blade. I'm just holding the hair and allowing the blade to go through and cut everything off that I want.
Alright so now let's look at that. That's looking nice and textured through there. So let's do the same thing on the other side.
Texturing the Top for Separation

So now from here I want to go through and methodically as possible texturize the top. This is what's going to give me my separation. It's also what's going to give me you know my pieciness so going through deep but gently channel cutting each and every section on the top.
Now by going through and doing this it's going to make the hair feel and look a little bit shorter. So maybe I should leave it a little bit longer before I go through and texturize it so I don't end up cutting everything off and making it too short.
Just continuing on to go through and each and every section as methodically as I can apply a lot of texture, deep channel cutting into the entire top of the head. I think we're looking pretty good.
I think the shape's there. We may need to do some fine tuning once we blow it dry to get the textures right and get everything just to where it pops but let's go ahead and blow it dry and check it out.
Finishing Textured Quiff Hairstyle
Here's our end result. I think it looks pretty good. It's a little more of a modern version of an 80s quiff than you know than the real short back and sides of it being overly tapered. I think the interesting part of it in today's masculine hair shapes is it's got more texture to it other than it just being super clean cut.
I think the texture is what keeps it a little bit more edgy and a little bit more interesting visually for our eye. It works on a lot of different types of hair, a lot of different types of hair textures and you have a lot of variety with it whether you want to go really short and longer or shorter all over. It works well on a lot of different things a lot of different textures and types of hair.
Please check out the Jatai Academy. There's all kinds of great information on there that will make you a better hairstylist and barber. And also please let us know what you'd like to see in the future. And until next time thank you so much for watching. We'll see you soon.
Final Look of the Mens Short Quiff Haircut

The male quiff style can be made to have even shorter sides or longer sides. Same with the top. But the overall concept is the same. The front quiff hairstyle is a defining feature of this look so styling the front can completely change the overall look of the haircut.
A long quiff hairstyle will be less clean cut and have a more lived-in look and a messy quiff hairstyle will have a more grungy rugged look. The versatility of the hair quiff makes this a fantastic style to learn. And learning how to style a quiff takes some practice and experimenting.
A boys quiff haircut works just the same. It looks great on boys, teenagers as well as adults. Even some women can rock a quiff.
How to do a High Quiff and Style for Pieciness
For men's coiffed hair you need to learn how to put your hair in a quiff. You can use a clay based pomade to get the pieces to separate. This will give that added textured look.
SHARE