Free shipping on orders of $50 or more within the USA and $90 or more to Canada! Note: Shipping to Canada is experiencing significant delays. See shipping policy page.
Get the latest Academy content and special deals direct to your inbox
When it comes to texturizing hair there are multiple ways create it. To create texture using a tool, hair professionals can turn to either shears, thinning shears or razors. If you use one of these tools, it’s important to learn various texturizing techniques. Each tool will give slightly different results. In the salon, hairdressing can be challenging. You are constantly dealing with different hair types such as thin or thick hair, straight or curly and short or long hair. You must take into consideration the client’s desires as well as the hair you are working with. These factors will help determine the tool used in adding texture to hair. This article will discuss how to texturize hair with some of the best tools on the market.
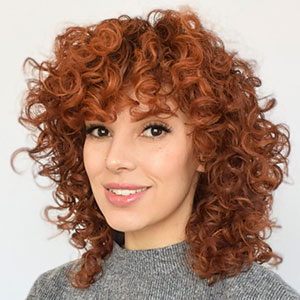
But first, what is textured hair? Hair with texture is one with volume and shape. This could come in the form of movement, body, airiness, curls or waves. Learning how to get more texture in hair is multi-faceted and there are many factors to consider when doing so.
In this video, Russell Mayes, Director of Content for Jatai, gives us a run down on how to texturize hair in a one length bob using scissors vs. a razor. By understanding the different techniques and the results they give, this can help you decide the best technique to use with your clients to create texture. You can follow along and view the video or read through the transcript below. Enjoy!
Today we’re going to be doing a study in texture and how to create textured hair. What’s the difference between texturizing with a scissor versus texturizing with a razor? Let’s get started. I’ve already gone through and cut everything one length. So that’s going to give me the simplest shape that I can really see the texturizing pop and the variations between the two. So I’m going to go through and deep point cut with the scissors the entire right side of the head and use some thinning scissors to thin it out where I feel like it’s too heavy. And then on the right side of the head I’m going to use my Feather Plier and go through and channel some texture into it and that will also remove weight where I feel that I need to and create separation.
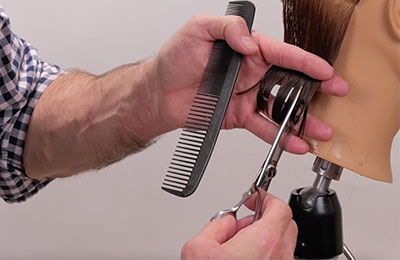 So we’re going to start right here on the right side of our section of the nape which is the occipital to the mastoid. I’m going to use my Jatai Kyoto Scissors. This is the sharpest scissor that I have and so it’s going to be easy for me to apply a deep point cut without having to fight it. I’m going to comb everything straight down and about halfway through I’m going to comb this right against my fingers to kind of flatten that section out and get it real straight and then I’m going to go through and just point cut real deep. I’m not keeping the scissor completely 100% parallel with the hair. I want to go through and cut it at an angle so I can create some separation and some pieciness to it. Now whenever I go through and do a deep point cut like this I’m basically only adding texture to the bottom 2 or 3 inches of the section. Now from here I’ll continue on taking parallel sections as I go up the head. And one thing that I want to be mindful of is to not pick up my previously cut section. I don’t want to go through and overly texturize hair that I’ve already gone through and cut and texturized.
I don’t want to take too thin a section. If I take too thin of a section I won’t be able to see how much that I’m actually taking out so I want a thick enough section that I can actually see my channel point cutting going through. Each section I will cut, I will cut independently of any other section so I have no guide. Each section is cut strictly by feel. If if I need to I’ll ribbon that section together go through, cut that up and in. And I’m going to continue my sections until I run out of hair.
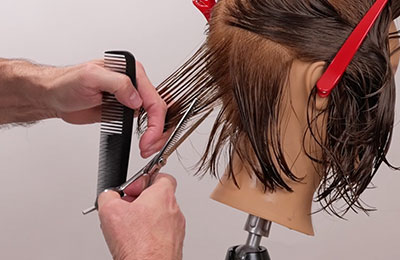 Now we’re coming to the last section. Now for areas that I feel like are too thick I can change up my approach by either going through re-sectioning standing up and going through and cutting through but it’s not very easy to control when I do that. On the bottom it you don’t have to have that much control but when you’re working internally you need more control. So in that case where I need more control over how much hair I’m thinning I’m going to use my Jatai Tokyo Thinning Scissors. This way I can control exactly how much I take and exactly where I’m taking it from and I can choose if I want the texture blade on top of the section or on the bottom. If I go through and use the cutting blade on top it’ll be a little bit more seamless so that’s what I’m going to do. I’m going to go through take a vertical section, point cut about halfway through. Where it gets longer I may hit it twice. That way I can thin without leaving any kind of scissor marks at all and I can also be much more in control of where I take my hair from and how much I take.
Like right here there’s less hair. Here there’s a little bit more so I’ll take a little bit more. This section there’s very little through here but just a little bit underneath so I’ll take there. And I’m going to go through and do this to all the sections. I will take a larger section and since I’m taking it vertical it’ll be easier for me to control than if I take a real fine small horizontal section.
Pull that straight out. Little bit there. A little bit more. A little bit more. A little bit more. Where it’s thicker I’ll take more. I’ll hit it more times. Where it’s not as thick, I won’t take as much. On the top I don’t want to run the risk of any kind of alfalfa sprig sticking up so I will never texturize more than about halfway through the section. If I start texturizing up here close I run the risk of that sticking up. Now that’s texturized for thinning to even out the thickness and point cutting on the bottom.
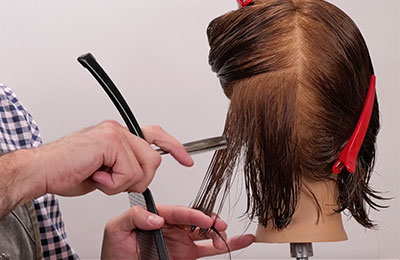 So now let’s learn how to make hair textured with a razor. On the razor side I’m going to go through and use a little bit of Jatai Blade Glide to help my razor slide through the hair more effortlessly. So now I’m going to use my Feather Plier Razor which is a guardless razor and I’m going to go through comb this section straight down just like I did on the other side but instead of point cutting up I’m going to razor cut and channel some of this out and take out as much hair as I feel that I need to. Now with this method I will actually thin and separate at the same time where the other side with the scissor I had to go through and do both independently.
I will not channel more than about halfway through the length of the section. I could probably get away with it more underneath than I can on top which sometimes I will actually go through and thin it deeper if I feel that the hair is so overly thick and really really stiff. Now I’m going to continue taking parallel sections as I run up the side of the head. Start in the center of the back and then work towards the front.
Close the blade each time so I don’t end up cutting any hair or cutting myself. Get that out of the way. Now as I’m going through and channel cutting this I want you to notice that I’m starting with the tip and then I will go in and that way I use the entire length of the blade not just the tip of the blade. I don’t thin this very very front piece here. I’ll thin the hair just behind it. Now I’m just going to continue on and do the same thing until I run out of hair being mindful to not pick up hair underneath as I texturize each subsequent section.
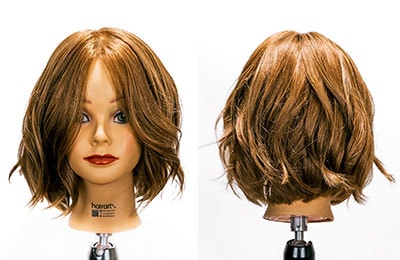
Now let’s see if we can tell a difference while it’s wet. Oh yes the scissor side is going to be a little bit well actually it’s a lot more solid than the razor side. And it’s heavier. It doesn’t have the same amount of movement to it that the razor side has but let’s blow it dry, take a look at it, see how we’re doing.
We’ve got our lovely model blown dry and now let’s compare the differences between the side done with the a scissor and a thinning scissor versus the side done with the razor where you channel cut it and controlled the weight at the same time. You can really see the differences with dry hair. Now on the right side you can certainly tell when I run my fingers through it it still has this nice solid shape and the texturizing is a very soft diffused kind of separation. I still have a good solid strong shape. It creates a lot of movement to it but it still has that solid one length shape and it just bevels my one length shape. So sometimes a one length bob can look very very blunt and broom like. So by going through and doing it this way I certainly bevel that but at the same time I keep it really straight. And most of the movement and texturizing is in the bottom two inches of the hair.
Even though I went through and texturized internally it was more of an even diffused thinning where I get the separation underneath. Now if I look at my razor side you can certainly tell when I run my fingers through this I’ve got a lot more separation of texture from the center all the way down through the ends and it forces it to separate into pieces much more prevalently than the other side.
So when would I use one over the other to texture hair? Say for instance that I have somebody with very very thick but fine textured hair, I’m definitely using the razor. If I have someone with thinner hair that I want to maintain a solid shape and I just want to soften the edges, then I’ll use a scissor for it. If I have hair that has a fuzziness in the texture, I’ll definitely use a scissor and a thinning scissor for it because I can get my thinning and control without any fear of it exploding the cuticle.
Now there are other texturizing techniques such as twist cutting but it’s not covered here. Click this link to see a video on twist cutting. While you can also create texturized hair by using chemical sprays or dry shampoos, cutting the hair with either a shear or razor can make texture last for a longer period of time. Sprays can leave build-up over time if they are not washed off thoroughly. Take care when using texturizing sprays and don’t over use them.
We hope you learned something about how to add texture to hair and it’s useful for you in the salon. Even though this was done on a one length bob, these techniques can be done on longer or shorter hair as well. A bob is just the simplest shape for this demonstration.
If you enjoyed this video, you can see our other videos in Jatai Academy’s Education Connect where we have hundreds of videos to learn from. There are also a number of other videos that show you how to texturize hair in other ways. You can also shop any of our products from our store. We hope to see you again soon.
JATAI provides innovative and professional quality beauty implements with world-class customer service and educational support. To offer great products as a master distributor, we seek out and select only manufacturers who demonstrate superior workmanship, the most advanced technology, and respected business core values of reliability, honesty and integrity. Accordingly, JATAI represents three major ‘workhorse’ brands that dominate within their categories. Feather, Seki Edge and Fuji Paper. JATAI Academy brings beauty tools to creative life. It’s the ultimate professional information resource where Education, Artistry and Trends CONNECT for Stylists and Barbers.