Free shipping on orders of $50 or more within the USA and $90 or more to Canada! Note: Shipping to Canada is experiencing significant delays. See shipping policy page.
Get the latest Academy content and special deals direct to your inbox
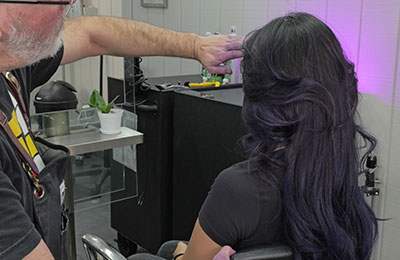
In this article we’re going to be doing a long length butterfly haircut with curtain bangs using the Feather Styling Razor. Follow along with the video. The video has been transcribed below.
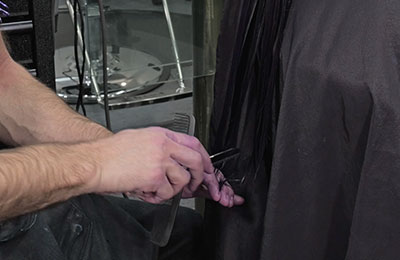
So this is how to do the butterfly haircut. We’re going to start in the middle with a section straight down the middle all the way back center back of the head. We’re going to go from occipital to mastoid. That’s going to separate all the flat area. And then since that area is a little bit thick I’m going to take a subsection of that and just give me enough hair I can control using my Feather Styling Razor and the special pink edition. We’re going to comb everything down and I’m going to go through and channel cut each one of these little sections so that I can get a piecey separation but still maintain all my length. So my razor stroke is probably about a 2 inch stroke but by going through and putting the tip of the blade in and channel cutting it, I’m not only texturizing the ends but I’m also cutting the length at the same time.
Now here I’m going to go through and continue the same methodology, take my next flat section, comb that down find my guide, go through with my razor, channel cut that into the desired length that I want so I can maintain separation on the bottom but still keep a very solid shape. I can certainly go through and channel deeper if I want more separation, more thinning. But I just want this texture to be on the ends so I’m going to go through and keep it just on the ends concentrated to where I want it to be and just follow the same guide that I had before and try to keep the same razor stroke of about 2 – 2.5 inches.
Here I’ll comb everything down make sure I don’t have any long little stragglers and now I’ll just continue this same methodology all the way up the head until I run out of hair. Same thing just combing everything down using my guide and continuing until I run out of hair, until I cut everything one length in the back.
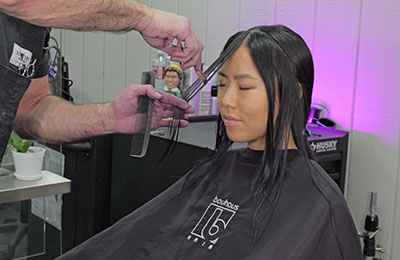 Now the whole idea behind the butterfly cut is that I keep my layering around the face and the back of it doesn’t have a whole lot of layering. It’s mostly concentrated around the face with beautiful face framing layers. So from here I’m taking from the first bump of the head where the bangs are to the high point of the ear. I’m going to pull a little section out in the center. I’m going to pull that forward and right about the tip of her nose I’m going to go through and channel cut this to make sure I get the right length that I want and also to get the separation that I want. So I want separation and pieciness and light and airiness on the ends but I still want a solid shape internal. So I’m going to use my little piece as my guide that I did right in the middle.
Now I’m going to take a broad razor stroke and go through and cut this entire length off. Now the difference between me channel cutting and just razoring the whole length of it off is by razoring the whole length of it off I’m actually going to get a lighter airier separation on the ends but I’m going to maintain a more solid piece. Whereas if I channel cut it, I’ll force that to separate into pieces that are much more defined so I’m pulling everything forward following parallel to my main parting that I took and cutting my length that I want.
I’m going to do the same thing on the other side. Take a nice broad razor stroke cut all that length off but I still want to maintain all of my length. So by razoring this front off, I’ll show you how I create shortness in the front and then build that up into a lot of length in the back. So once I get everything fit in around the face look I want by pulling it forward I’m actually going to feather everything back. And this cut is very reminiscent of a 70’s you know Farrah Fawcett kind of feather cut.
After I get everything fit in like I want around the front, I’ll continue my sectioning towards the back of the head. Here I’m taking from the high point of the head right to the mastoid. I’ll find my guide underneath and then I’ll continue that same broad razor stroke all the way down. Now here where I started in the center I blended that with my guide underneath. As I continue to work down I will increase the length so it only blends at the top of the head, but as I get closer to the bottom of the head it gets longer and longer and longer. So I’m actually step layering it going from the front to the back but keeping it blended right there at the top in the bang section. Checking my overall length and shape and seeing how that’s fitting in around the front and making sure that looks good before I continue on to the opposite side. And I’ll do the same thing.
 It’s going to blend right at the top center where her bangs are and it’s going to gradually increase in length as I go down the head and get into my perimeter length. So by keeping it short and layered around the front and then disconnecting it as I go towards the back I can still get a blend because it is blending from the top to the bottom. Checking the lengths there making sure they’re looking pretty good. Got a little bit right there on the left side making sure that that blends in. And taking my time because this is important that I get the textures right and the shape even around the front because when I feather it back I want it to be as symmetrical as possible on each side.
Now since it’s not a real precise haircut on the shape that I’m cutting, it needs to be precise and how it fits the head. So as I continue to work back, the sections blend at the top and then gradually step disconnect as it it goes towards the bottom but I want to make sure that I’m keeping all of my sections very very symmetrical and the same on both sides. I don’t want one side to get layered more than the other. I already have an off center part so I have to deal with the weight distribution but by keeping my partings the same on both sides I can maintain a symmetry in the haircut. After I finish that I’m going to go right back to the center of the back of the head pull everything forward and down. Now you notice the further in the back I go, the more I angle that section down. The more that I angle it down the more weight that I’m going to create. The more I pull it forward the more feathering back that I’m going to create.
So after I go through and cut the entire side I’m going to shake it out and check it. It’s going to be layered a lot more around the face. It’s going to be lighter and a lot heavier in the back. But I want to check and make sure that my flow is proper. It’s flowing out of the face and giving me that kind of feathery butterfly wing kind of look. Now this one’s going to be a little shorter because I’ve cut a real short little bang right in the center that I’m using as my guide. You could certainly do this a lot longer like Farrah had it and have that flip more around the face but on this one with some bangs it gives it a little bit more neutrality and interest around the eyes. So I’m going to continue the same thing on the opposite side here continuing to pull everything forward and down and making sure that that blends in through with the front. Making sure I’m taking my time and that my partings are symmetrical on each side. Continue to pull if nothing cuts. If nothing reaches, nothing gets cut. I’m going to pull and check following through with my razor.
Now as I go through and razor I’ll start at the base of the blade back closest towards my hand and then as I razor motion, I’ll go more toward the tip. I don’t want to just razor with just the tip. I want a razor using the entire length of the blade so that I can use the whole blade and it doesn’t dull out just the tip. Check this side make sure everything’s looking pretty good, shaking everything out and seeing how it looks. And I I think that this is looking pretty good. Real solid on the bottom but very light and airy around the face. So let’s go through and put a little texture spray into it and go through and blow it dry.
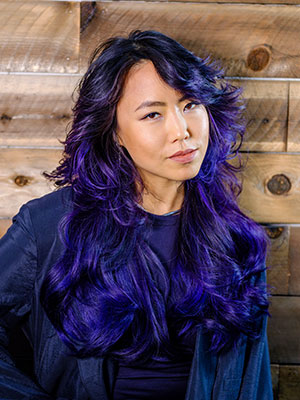
 I’m going to blow dry everything back off the face and then we’re going to put a little bit of curl in it just to enhance it a little bit. You can certainly see that we got a lot of layering around the front. It’s feathering back off the face. We can put more curl in there if we want, less curl if we want. From beginning to end, this is how to do the butterfly haircut. We hope you enjoyed this demonstration.
A few notes about butterfly haircuts in general. Butterfly haircuts work best on medium to thick hair. They don’t work as well on thin hair. It can work on any hair color from blonde highlights to brunette to colored hair. The butterfly cut creates wispy layers in the front for extra volume. It’s the short layers in the front that gives the butterfly haircut it’s name. It’s a lovely style that can work on medium to long hair. You can do a short butterfly haircut with curtain bangs but the hair should be at least to the collar bone. And while this was a tutorial on a butterfly haircut with curtain bangs straight hair, it can also be done with wavy or curlier hair types.
Follow along on how to do the butterfly haircut in the video above or watch it at Jatai Academy’s Education Connect portal. There’s a lot of great information on there that’ll make you a better hairdresser.
JATAI provides innovative and professional quality beauty implements with world-class customer service and educational support. To offer great products as a master distributor, we seek out and select only manufacturers who demonstrate superior workmanship, the most advanced technology, and respected business core values of reliability, honesty and integrity. Accordingly, JATAI represents three major ‘workhorse’ brands that dominate within their categories. Feather, Seki Edge and Fuji Paper. JATAI Academy brings beauty tools to creative life. It’s the ultimate professional information resource where Education, Artistry and Trends CONNECT for Stylists and Barbers.