Free shipping on orders of $50 or more within the USA and $90 or more to Canada! Note: Shipping to Canada is experiencing significant delays. See shipping policy page.
Get the latest Academy content and special deals direct to your inbox
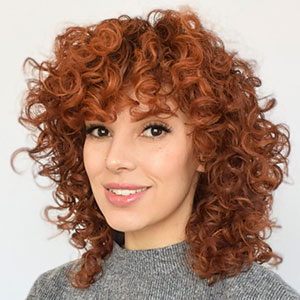
You probably know what a pixie cut is, but do you know what a long pixie is? Pixies are generally very short on the sides and around the nape. They can be short on the top as well. But a long pixie is just longer on all sides. In this video below you will learn how to cut a long pixie cut using a razor and scissors. You can follow allow with the video and the transcript.
This is not a DIY pixie cut tutorial where you learn how to do a pixie cut at home. This is for professional stylists. Take this pixie cut step by step and you’ll gain valuable insight on how to use the Feather Plier Razor to sculpt the hair with unparalleled precision. Russell teaches you how to balance proportions, create texture, and how to make your cut fit your clients head shape to accentuate facial features. But this isn’t just about technique—it’s about creativity and self-expression and the ability to customize your haircut.
Welcome to the Jatai Academy. I’m Russell Mayes, Director of Content. Today we’re going to be doing a pixie but we’re going to be doing a long pixie. So let’s get started.
Pixies are short. They’re short haircuts. They’re usually a little feminine, shorter around the ears and around the nape. That is the main characteristic of it. Sometimes a pixie is the same length all the way around with it being really cropped on top. That would be a short pixie, a Rosemary’s Baby kind of pixie.
We’re going to be doing something a little longer on the top so I want to keep this around the nose but I still want to keep this short over the ears and the nape. So we’re going to do a little disconnection on top and give us a little moppy hair that can kind of flows back and forth.
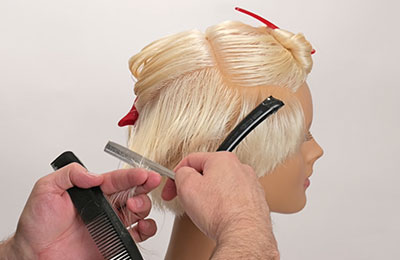
 So I’ve got the top sectioned out from the bottom on both sides. Now I’m going to go through and I’m going to take a vertical section that is going to be parallel to my front hairline. That section is also going to be parallel to this hairline behind the ear.
The doll head is a little bit off, but it’s the same on all humans. This front hairline will be parallel to the hairline behind the ear so I’m going to work on that as I go. Working on an angle as opposed to being straight up and down gives the hair a little bit better flow.
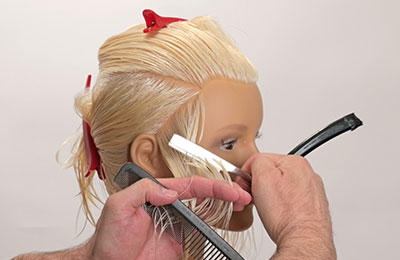
So I’m going to start with my Feather Plier Razor. I’m going to pull this forward, T to my parting. I want to leave this front longer and then this back shorter. So we’re going to pull that forward. We’re going to start up here in the front. I’m going to leave that longer and real gently take that shorter at the ear.
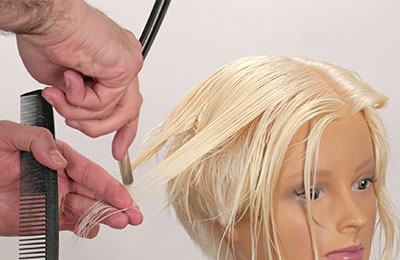
I’ll take a parallel section. Pin that hair out of the way. Now I’m going to combine these two sections together. I’m going take the front, the first section and the second section. Combine them and pull that forward to the front section, not in the center of both of them but to the front.
Elevate out. Get my razor ready. There’s my guide from underneath. So a nice smooth razor stroke as I go back. We’re going to go through and I’m going to continue working this guide all the way back into the center of the head, pulling each section to the previous section.
Comb to the previous section. I got my length there in the front. Continuing that shorter as I get to the ear. Now as I’m going from the ear down to the nape this is going to get really short really quick because I’m going from this length at the ear continuing that angle of getting shorter as I go into the nape.
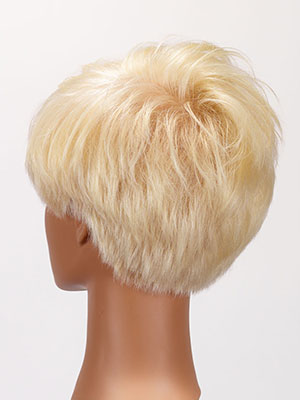
So now we have a nice smooth transition from the sides into the back. Next section. Keep that parallel to my previous section combing into the previously cut section. There’s my guide. Nice broad stroke as I’m working that down and through into the nape.
Going to continue on. We got probably two more sections here. There’s my section as a guideline. Continue that. Come here. Continue that down and through.
Now just because I’m using a razor does not mean that I can be really sloppy with my technique. I still want to maintain a solid technique, a solid approach to my technique. That’s looking pretty good. And then our last section on the right side. Here’s my guide.
Follow us on your favorite social media platform @jataifeather
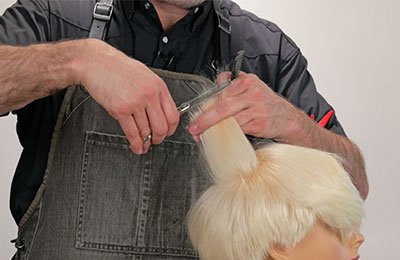
Combing into the previously cut section, shorter at the bottom longer at the top. Cleaning up this very bottom bit through here. Just pinch being respectful of the blade as I go through. Now as I’m using a razor you know I want to use something that’s going to be sharp. It has to be a sharp blade. If it’s a dull blade it’s going to start to push the hair so I want to make sure that my blades are sharp and that I have a nice balanced handle.
So the Plier is the cleanest cut and gives me the most control over any razor that I have. I have other razors like my Feather Styling Razor and this is good for starting but it’s not going to be as precise a cut as my Feather Plier.
We’ve got the right side done. Now let’s go through and do the same thing on the other side. So now that I finished the underneath hair, the short part that I’ve got that cropped in like I want, I’m going to go through and separate the top from the front to the back. I’m going to take a center part to the crown. From the crown I’m going to go to the ear, the quarter part and separate the front from the back.
And now from here I’m going to take a diagonal section. Pick up my hair from underneath and blend that through. If the hair starts to get too dry I’m going to use Jatai Blade Glide to go through and re-wet the hair. So not only does this re-wet it and keep the moisture, it also gives me a little bit of slip so when I’m cutting with the razor it gives me a cleaner cut and it doesn’t catch.
 So now when I go through I’m going to comb this section over to the side hold it out at the curvature of the head, peak elevation, which is that elevation right there. Follow the guide that I have cut underneath.
So what I’m going to do is I’m going to start building up some weight. So as I start to build up weight that’s going to build up some length on the top as well and give me more of a moppy look. Hold off the peak curvature. There’s my line from underneath. Take a broad stroke
and cut that through.
And when I comb I’m looking for any kind of weight that doesn’t seamlessly blend in with the rest of the hair. As I comb this way, I comb that way, I comb back and forth I want to see if anything pops out and then I’ll recheck that section to see if I need to cut more. I’ll do this until I get to the center which is going to be this last section.
Oops! Same thing as before. Peak curvature. There’s my line. A nice broad soft stroke. Check. Make sure there’s no weight. It all blends perfectly. Now we’re going to do the same thing on the other side. So now let’s move on to the top, the rest of the top and we’re going to do the same thing we did in the back.
I’m going to take a parallel section to the section I had underneath. Comb that down. This is my short piece and I want this to kind of go about to the tip of the nose and I want to keep that fairly heavy. So I’m going to go off of the peak curvature of the head. That’s going to be my elevation.
I’m not really worried if this blends with the hair underneath. I’m worried more that it blends with the hair in the back and it’s getting to that length of right around the tip of the nose around the front. Parallel section.
Keeping this really really soft with a broad stroke. I can always go back and blunt that shape up but it’s harder for me to go back and soften it after I’ve already cut the shape so I want to be very very conscientious of how soft I make it as my first pass.
 In the last section on this side again going off the peak curvature of elevation so I know exactly the angle that I’m going to hold it at for every section. And then that way it makes it easy to repeat on the opposite side.
We’ve got this section finished here. Everything’s looking pretty good. I got the length that I want around the face. I got that blended through into the back. I got it nice and cropped over the ear. So now let’s go through and do the same thing on the other side.
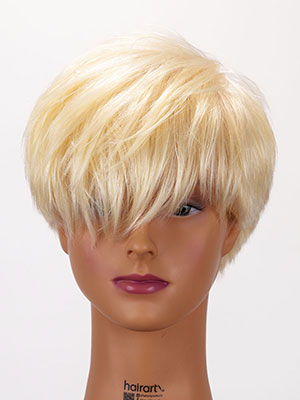
We got our basic shape done. I think we’re looking pretty good. We got the length pretty good around the front where I like it. I think she’s a little fluffy right here on the sides and in the nape and also I want to go through and put some texture through here in the top and right around the front here because I feel like it needs some more texture and some separation to it so it doesn’t look as solid and as frumpy. So lets address this fluffy pixie cut.
So in order to put some texture into it I’m going to go through and use my Jatai Tokyo Thinning Scissors. This is a nice way to remove a lot of weight or a little weight depending upon how many times you hit it and how close to the scalp you go. So we’re going to start here on the sides. I’m going to pin this hair out of the way and I just want to fit this in a little bit tighter through here.
So we’re going to start at the bottom and I’m going to go about halfway into the length of the hair and I’m going to hit this several times so I start to remove more of that weight internally.
 Also, these mannequin heads can get a little pokey on the sides so taking that down a little bit will certainly alleviate that kind of puff. Same thing here in the nape. I want to go through fit that in a little bit closer down at the nape. Soften that up. So I’m going deeper down at the bottom to remove weight and then as I get to the top I’m just blending those textures through.
If you haven’t already give us a thumbs up, click the subscribe and the notification bell to be notified of future Jatai Academy content.
Now I’m going to go through and take some weight out of the crown here. Now this I’m going to completely just kind of disconnect and not worry about blending it through. I just want to go through and take this shorter through here just to get some separation, some weightlessness, some texture to it and a little softer in the crown.
So if I want to spike this up a little bit I can have a little bit more movement to it and a little bit more texture. So just right there and the crown pulling everything up taking that a little shorter through there and then I want to go through and take some weight off of this very very front.
I’m going to leave some weight right here in the middle so I still have that flow and that movement and that weighty kind of pixey look to it but around the edges I’m taking that a little softer, just pulling a vertical section up, taking that through if I need to.
Point cut some areas where it feels a little thicker right here. The last section right there. Yes that’s better. Now we can kind of see through a little bit when we go to the side. I like that better. I think that that texturizing with my Jatai Tokyo Thinning Scissors underneath really helped make the shape pop it took and instead of this being quite so thick and so voluminous it really kind of softened this whole underneath and made it much more pliable and I think more pleasing to the eye and also making it a little bit more airy around the front. I think it really added to this as well.
So if you have any questions or comments about how to cut hair into a pixie please let us know. Let us know what you’d like to see in the future. Also check out the Jatai Academy. There’s all kinds of fantastic content on there to make you a better hairstylist and barber as well as find some of the best tools in the business. Thank you so much for watching this long pixie haircut tutorial and we’ll see you next time.
If you want to learn how to cut a pixie that’s short (not long), watch this Emma Watson inspired pixie haircut.
JATAI provides innovative and professional quality beauty implements with world-class customer service and educational support. To offer great products as a master distributor, we seek out and select only manufacturers who demonstrate superior workmanship, the most advanced technology, and respected business core values of reliability, honesty and integrity. Accordingly, JATAI represents three major ‘workhorse’ brands that dominate within their categories. Feather, Seki Edge and Fuji Paper. JATAI Academy brings beauty tools to creative life. It’s the ultimate professional information resource where Education, Artistry and Trends CONNECT for Stylists and Barbers.