Free shipping on orders of $50 or more within the USA and $90 or more to Canada! Note: Shipping to Canada is experiencing significant delays. See shipping policy page.
Get the latest Academy content and special deals direct to your inbox
What is a lob? A lob is basically a long bob. With hair that goes just past the shoulders, the lob is a popular women’s haircut. With a messy lob, this means the lob has more texture and is not just one length or a blunt haircut. It has movement, depth and dimension. The best way to achieve this is to include the use of a razor.
In this tutorial, Russell Mayes, Director of Content for Jatai, will show how to cut a straight long bob in an easy to understand fashion. You can watch the video below and follow along with the transcript. So forget about the long concave bob, long angled bobs, long swing bobs or graduated long bob hairstyles. This is all about the messy lob.
FYI: This is not a long bob diy to teach you how to cut a long bob yourself. This is for hair professionals.
Enjoy!
Welcome to the Jatai Academy. Today we’re going to be doing a lob with texture otherwise known as the messy lob. So let’s get started.
So the difficult thing about doing a lob that’s kind of messy is to make it look like it’s supposed to look that way. So what we want to keep in mind is that we still want a really solid lob shape with a lot of internal texture near the end so you can get that messy shape but still have enough weight and solidity to really hold that lob look.
So I’m going to start with my Jatai Osaka Scissors. So this is a little longer blade. It’s a nice sharp clean edge so that when I go through and point cut the bottom I can still have a nice solid clean shape.
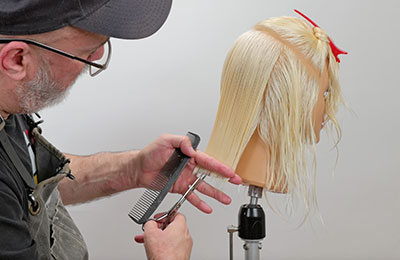
First thing we’re going to do is take a natural or center part to the occipital bone, occipital bone to the mastoid on both sides. This gives me enough hair that I can really start to build my lob shape. Let too little hair and I start to guess where the shape is and I don’t have a good enough guide for the next sections that I start cutting.
So I’m going to make sure it’s directly in front of me. Tilt the head down a little bit. When I’m combing, I’m combing away from me to make sure I get everything clean at the roots all the way through.
 About halfway I’ll tilt the comb make sure that’s the only texture that I’ll get. I’ll lay my finger right there where I want to cut. Ring finger will support. And then I’m going to go through as I point cut that line across.
Clean up a little bit where I need to. That’s going to be my baseline of my length for the entirety of the shape. Next piece, comb this down, there’s my length. Go through point cut that.
I want to try to keep my point cuts about the same level of depth throughout the whole perimeter shape meaning I don’t want one area to be texturized deeper, point cut deeper than another area. It’s going to take a little bit of practice, but you’ll get the hang of it soon enough.
Next section, comb down, tilt the comb, create the tension, put my fingers in there. I went a little bit too far. Go back. There’s my guide.
Point cut that through. Try to match the depth of my point cut and the length. So this is going to take a little bit of practice and a little bit of control of your scissor blade making sure you don’t cut yourself as I’m going through and point cutting this the same depth all the way around.
After I do that I’ll come in and check and see oh that looks fairly even. I got a few long little sprigs there. We’ll cut those. And now I’ve got my basic shape in here. That is going to be my guide for the entirety of this haircut. Now from here I want to maintain this same sectioning as I go up the head.
So I’m going to take from the top of the ear. There’s my center. I’m going to follow that same section all the way through. Pin this up out of the way. Make sure that that matches the same angle and then do the same thing on the other side.
So I’ve got my guide from underneath and I’m just going to go through and work this like I would do a on length bob, the only difference being that I’m deep point cutting each section instead of cutting it blunt.
Now as I go through and I cut this on top of my guide I want to be mindful that I’m not cutting it shorter than my guide. That’s the hardest thing about cutting hair is staying on top of your previously cut guide.
There’s my guide especially when you’re going through and doing something as soft and as textured as a deep point cut like this. Cutting from the center going forward on both sides.
Find the next flat section. There’s my parting and then I want to draw that all the way through and around. Make sure that that parting is parallel.
What will happen a lot of times is as people take this parting as they’re sectioning into the side they change the angle. And what happens is they end up taking an angle that’s something like this where it starts becoming a more vertical angle as opposed to a more horizontal angle.
 So I want to make sure I can keep everything the same as I go up. It makes for a much more consistent haircut and it takes a little bit of practice. Okay it…okay it takes a lot of practice. Small piece underneath as my guide. Piece from the back as my guide. Go through point cut that through.
Comb nice and smooth, even, no tension, Tension. The only tension that I put in here with my fingers is when I grab it to cut it. The only other tension that I’m getting is from the comb pulling it through and me flipping my comb.
Since my parting is the same on both sides I know that if I comb that T to my parting that my angles will match on both sides because not only do I have a guide of length underneath I have a guide of where I’m combing each section from my parting. A little bit right there. I want to clean up but I’m not being real precise and anal about every little hair here on the bottom being exactly the same length.
It’s a messy lob so I need the softness of that texture to soften the structure but because I’m cutting it blunt with a scissor it’s still going to maintain a solid shape when it falls. I comb it down. There’s very little that reaches.
And just comb down and cut anything that hangs over off. There we got a little bit of hair there in the front and that brings us to our lob shape being completed. Depending upon the type of hair that you’re working on, the texture of it and how much separation that you really want for your end result is going to determine what type of tool I use.
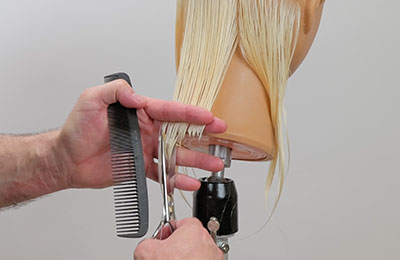
If I want something that’s going to be flicky then I’m going to use my Feather Plier Razor because that allows me to channel it and make the hair separate into pieces more. So what we’re going to do is we’re going to start with hair underneath in the nape. So I’m going to go through and take a vertical section here and apply my texture.
If I take a horizontal section it’s going to be a more solid shape. If I take a more vertical section it can be more flicky from my separation when I go through and channel it. So that’s what I’m going to do. I’m going to hold this section 90° from the head. There’s my angle.
 We’re going to take my Feather Plier Razor and I’m going to go through about halfway and channel that down and through. Where it’s thicker I’ll take a little bit more. Where it’s not as thick I’ll take a little bit less. That will be my first section.
Now I want to go through and kind of move that and see if that’s giving me the kind of flicky separation and giving me enough down there on the bottom before I move on. Because it’s hard to come back to it so I want to check this out and see and I’m thinking that that’s looking pretty good.
I’ll take the next section which will be another section right and as I start to walk back I will comb this section completely out of the way. I don’t want to texturize it again. Hold that out. This is a little thinner so I’ll take a little bit less through there.
Pull that out of the way a little bit more right through there. Get my separation into it, check it out. And that’s looking pretty good. Now I’m going to walk this all the way over to the other side of the head. Come through. A good channel through this piece here.
And that’s looking pretty good. Close my blade as I continue on section by section and just texturize the whole top of it exactly the same way that I’m doing around the front.
This is a little thinner so it’s not going to get as much texture but each channel will be more severe.
Follow us on your favorite social media platform @jataifeather
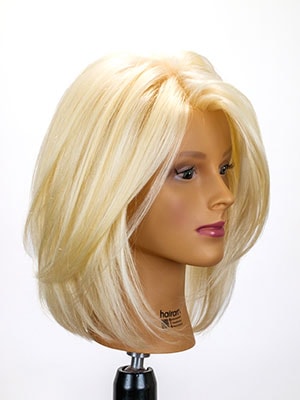
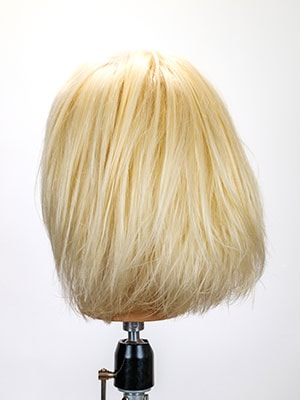
Alright. Here’s our finished result. We’ve got a nice bit of texture into it. It keeps it kind of messy but we still have a nice solid lob shape to it which I think is important when you’re doing something that’s going to be messy like this especially on a finer texture of hair. I think it looks pretty good. Girl you look good. You got that blondie thing going on. I like it.
Check out the Jatai Academy. There’s all kinds of fabulous information on there that will make you a better hair stylist and a better barber. Let us know what you’d like to see in the future and thank you so much for watching. We’ll see you next time.
Below is the final lob or long bob hairstyle. It’s a beautiful updated style that stands the test of time. See the long bob back view as well. We hope you learned something about how to cut a long bob with layers. Leave us a comment and let us know what you think!
JATAI provides innovative and professional quality beauty implements with world-class customer service and educational support. To offer great products as a master distributor, we seek out and select only manufacturers who demonstrate superior workmanship, the most advanced technology, and respected business core values of reliability, honesty and integrity. Accordingly, JATAI represents three major ‘workhorse’ brands that dominate within their categories. Feather, Seki Edge and Fuji Paper. JATAI Academy brings beauty tools to creative life. It’s the ultimate professional information resource where Education, Artistry and Trends CONNECT for Stylists and Barbers.